• Front
  • HOME
  • Student Gallery
    • Student Gallery Home
    • Concept
    • Animation
    • Game Design

Entertainment Design

ArtCenter College of Design

  • Front
  • HOME
  • Student Gallery
    • Student Gallery Home
    • Concept
    • Animation
    • Game Design

Wk 14: Final Storyboards, Final Prop Drawing

Hello all,

This is the home stretch, the last hurrah, just one more push to the end! We are finishing everything this week including our storyboard project and the prop design to go along with it.

Here’s what’s expected for homework this week:

  • Final Storyboards on two pages - pen/marker, gray tone

  • Prop Final Drawing - pen

  • Clean Floor Plan of scene (if not done)

  • Re-do any homework

For the final boards, we will review the refined pencil boards and make any last changes. We continue to ask ourselves the three questions: Does the shot tell us what is happening in the script? Is the character blocking working? Is the scale correct?

Feel free to use ballpoint pen, black pencil, marker, etc. just no pencil. You can use gray tone marker to add local values or lighting but it should enhance and not confuse your drawing.

Make sure your handwriting looks nice, number your boards, and don’t forget to put the movie title and your name on the pages.

For the prop final drawing, we will be making an ortho/grid template. This part you can use rulers.

Because of every person’s prop being so wildly different, we will approach it from what we know about building sections from XYZ shapes and building boxes and shapes from the treasure chest project.

See following images for tips on drawing wheels, rotated panels, and dividing circles.

Wk12_Dividingwheelscircles_02.jpg
Wk13_FoodTruckExterior_02.jpg
Wk13_TreadGear_01.jpg
Wk13_RotatedShape_01.jpg
Wk12_Dividingwheelscircles_02.jpg Wk13_FoodTruckExterior_02.jpg Wk13_TreadGear_01.jpg Wk13_RotatedShape_01.jpg

Have a nice rest of the week and see you Week 14! You can do it!

-Juliana

Friday 04.15.22
Posted by Fernando Olmedo
 

Wk 13: Refined Storyboards, Prop Orthographic Drawing

Hello!

This week we are refining the storyboards to include the hard surface prop and architectural details. We are also drawing the final prop orthographic drawing.

In the refining phase, we will look at the angle and perspective for each board and see if we can improve them. Ask yourself these few questions:

  1. Does this shot tell us what is happening in the script clearly?

  2. Does the character blocking work? (Do we need to adjust the angle, zoom in or out?)

  3. Is the scale correct? (Head sizes, proportions/heights of objects, etc.)

To sketch your prop in the boards, you may find that the prop (or any object for that matter) is rotated. This means we need to figure out the vanishing points for the rotated object. For the purposes of storyboarding, we don’t need to exactly find the VPs and construct it all but a rough box/grid will do. For me, it’s always helpful to imagine the object contained in a box and sketch it that way first so I get a rough idea. How do we know if it’s correct? It’s just a feeling you develop with more practice and observation from life.

Use your reference pages to help with additional details, and bring your drawing to a refined pencil drawing level.

For the prop orthographic drawing, we are doing the same process as the treasure chest project. We’ll construct the orthographic views with squares. Since this is a prop, we will finalize the design and orthograph this week!

In conclusion, this is what’s expected for next week:

  • Refined storyboards to a clean pencil drawing (include prop in 2 of the boards)

  • Prop orthographic drawing (clean pen drawing)

  • Clean Plan View drawing of scene

Good luck and see ya next week.

Friday 04.08.22
Posted by Fernando Olmedo
 

Wk 12: Floor Plan, Storyboard Roughs, and Prop Ideations

Hello!

This week we are continuing on our final storyboard project with making a floor plan to place characters and camera positions. We will also be starting our design process for the hard surface prop.

Here’s what’s expected for homework this week:

  • Plan view of scene location, characters, camera placements (number them) - pencil ok!

  • 1 page character line-up (can be silhouettes or rough sketch)

  • 2 pages of rough storyboards for movie scene: Include script lines/main action, shot type, characters, and perspective grid/horizon line for each storyboard, 4 storyboards per page - pencil ok!

  • 1 page of 10 (minimum) silhouettes prop ideations - black marker

  • 1 page of 4 detailed prop ideations - pen/marker

After making a floor plan, we will be using it to rough out the 8 boards that were noted in the script annotations. Where you place the camera in the floor plan will determine what kind of perspective will be in the board. Here are the rough steps for this process:

1) Draw frame for aspect ratio.

2) Write down what the action is. Perhaps a script line?

3) Based on your notes, block in the characters and action with the appropriate shot type

4) Establish the horizon line based on the block-in of the characters.

5) Rough in the perspective grid, matching the floor plan/camera placement drawing. (There may be some back and forth adjustments between rough boards and floor plan)

For prop ideation, we will start with silhouettes first. Depending on what the object is, you may choose a particular view that would be the most useful to explore different shapes. For example, I will use a profile view of the “gravy boat car” for my ideations.

For the detailed prop ideation, we will take 4 of the best silhouettes to develop larger. Similar to the ideations from the treasure chest, we will add more details and forms based on the reference pages.

Friday 04.01.22
Posted by Fernando Olmedo
 

Wk 11: Final Storyboard Project - Script and Reference Images

Hello all,

We are embarking on the final storyboard project for the rest of the term! For the next few weeks, we will be studying the script from one movie and creating some storyboards and one prop design.

This week however, we will be focusing on choosing a movie/script, reading and finding one scene, and annotating it. After that, we will create reference image pages for the setting, characters, and prop design.

For homework:

  • Choose a movie from the list. (Any other one will need approval from me!)

  • Read the script and find a scene that contains: characters, 1-2 environments with architecture, action

  • Annotated scene from script (page quantity will depend on the scene). Include LEGIBLE written notes for story moments, shot types, design call-outs, thumbnails etc.

  • Minimum 4 research pages: 2 pgs for location/architecture, 1 pg for characters, 1 pg for hard surface prop

  • “Scale with Boxes” in-class drawing

  • ArtCenter Hallway environment drawing

Here is the movie list with links to the screenplay:

Pet Sematary

Coraline

The Incredibles

The Iron Giant

Pulp Fiction

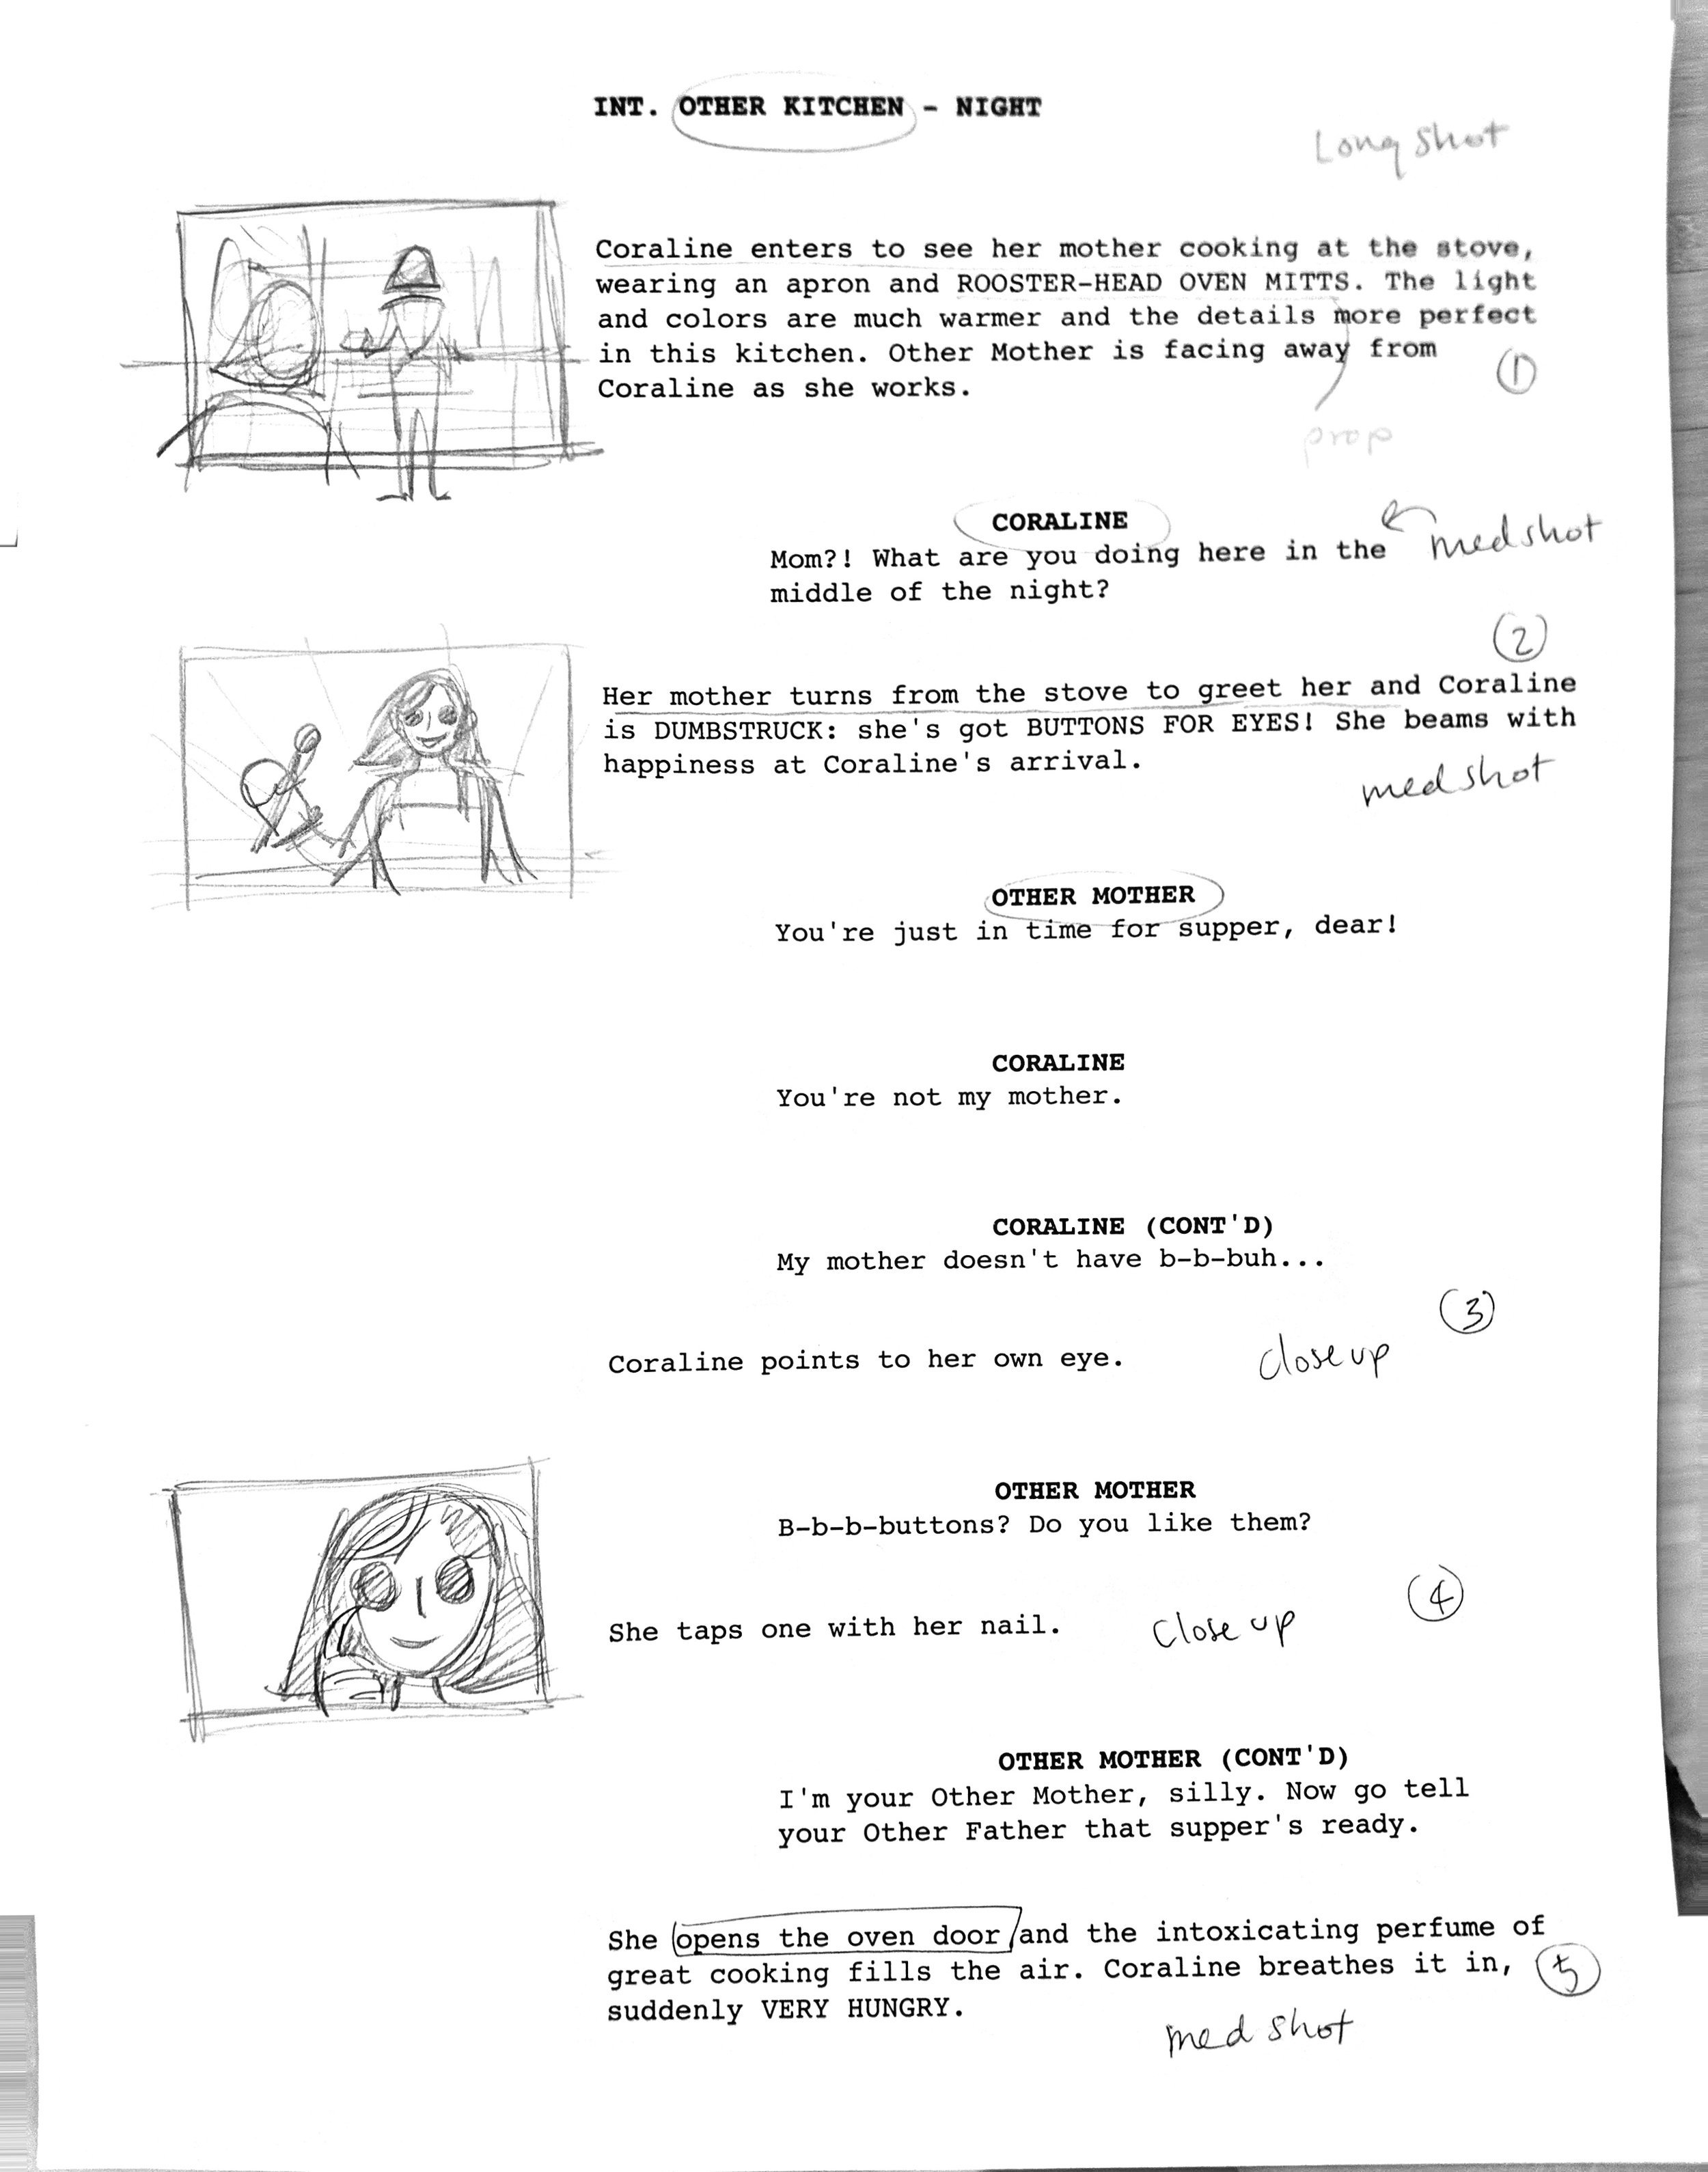
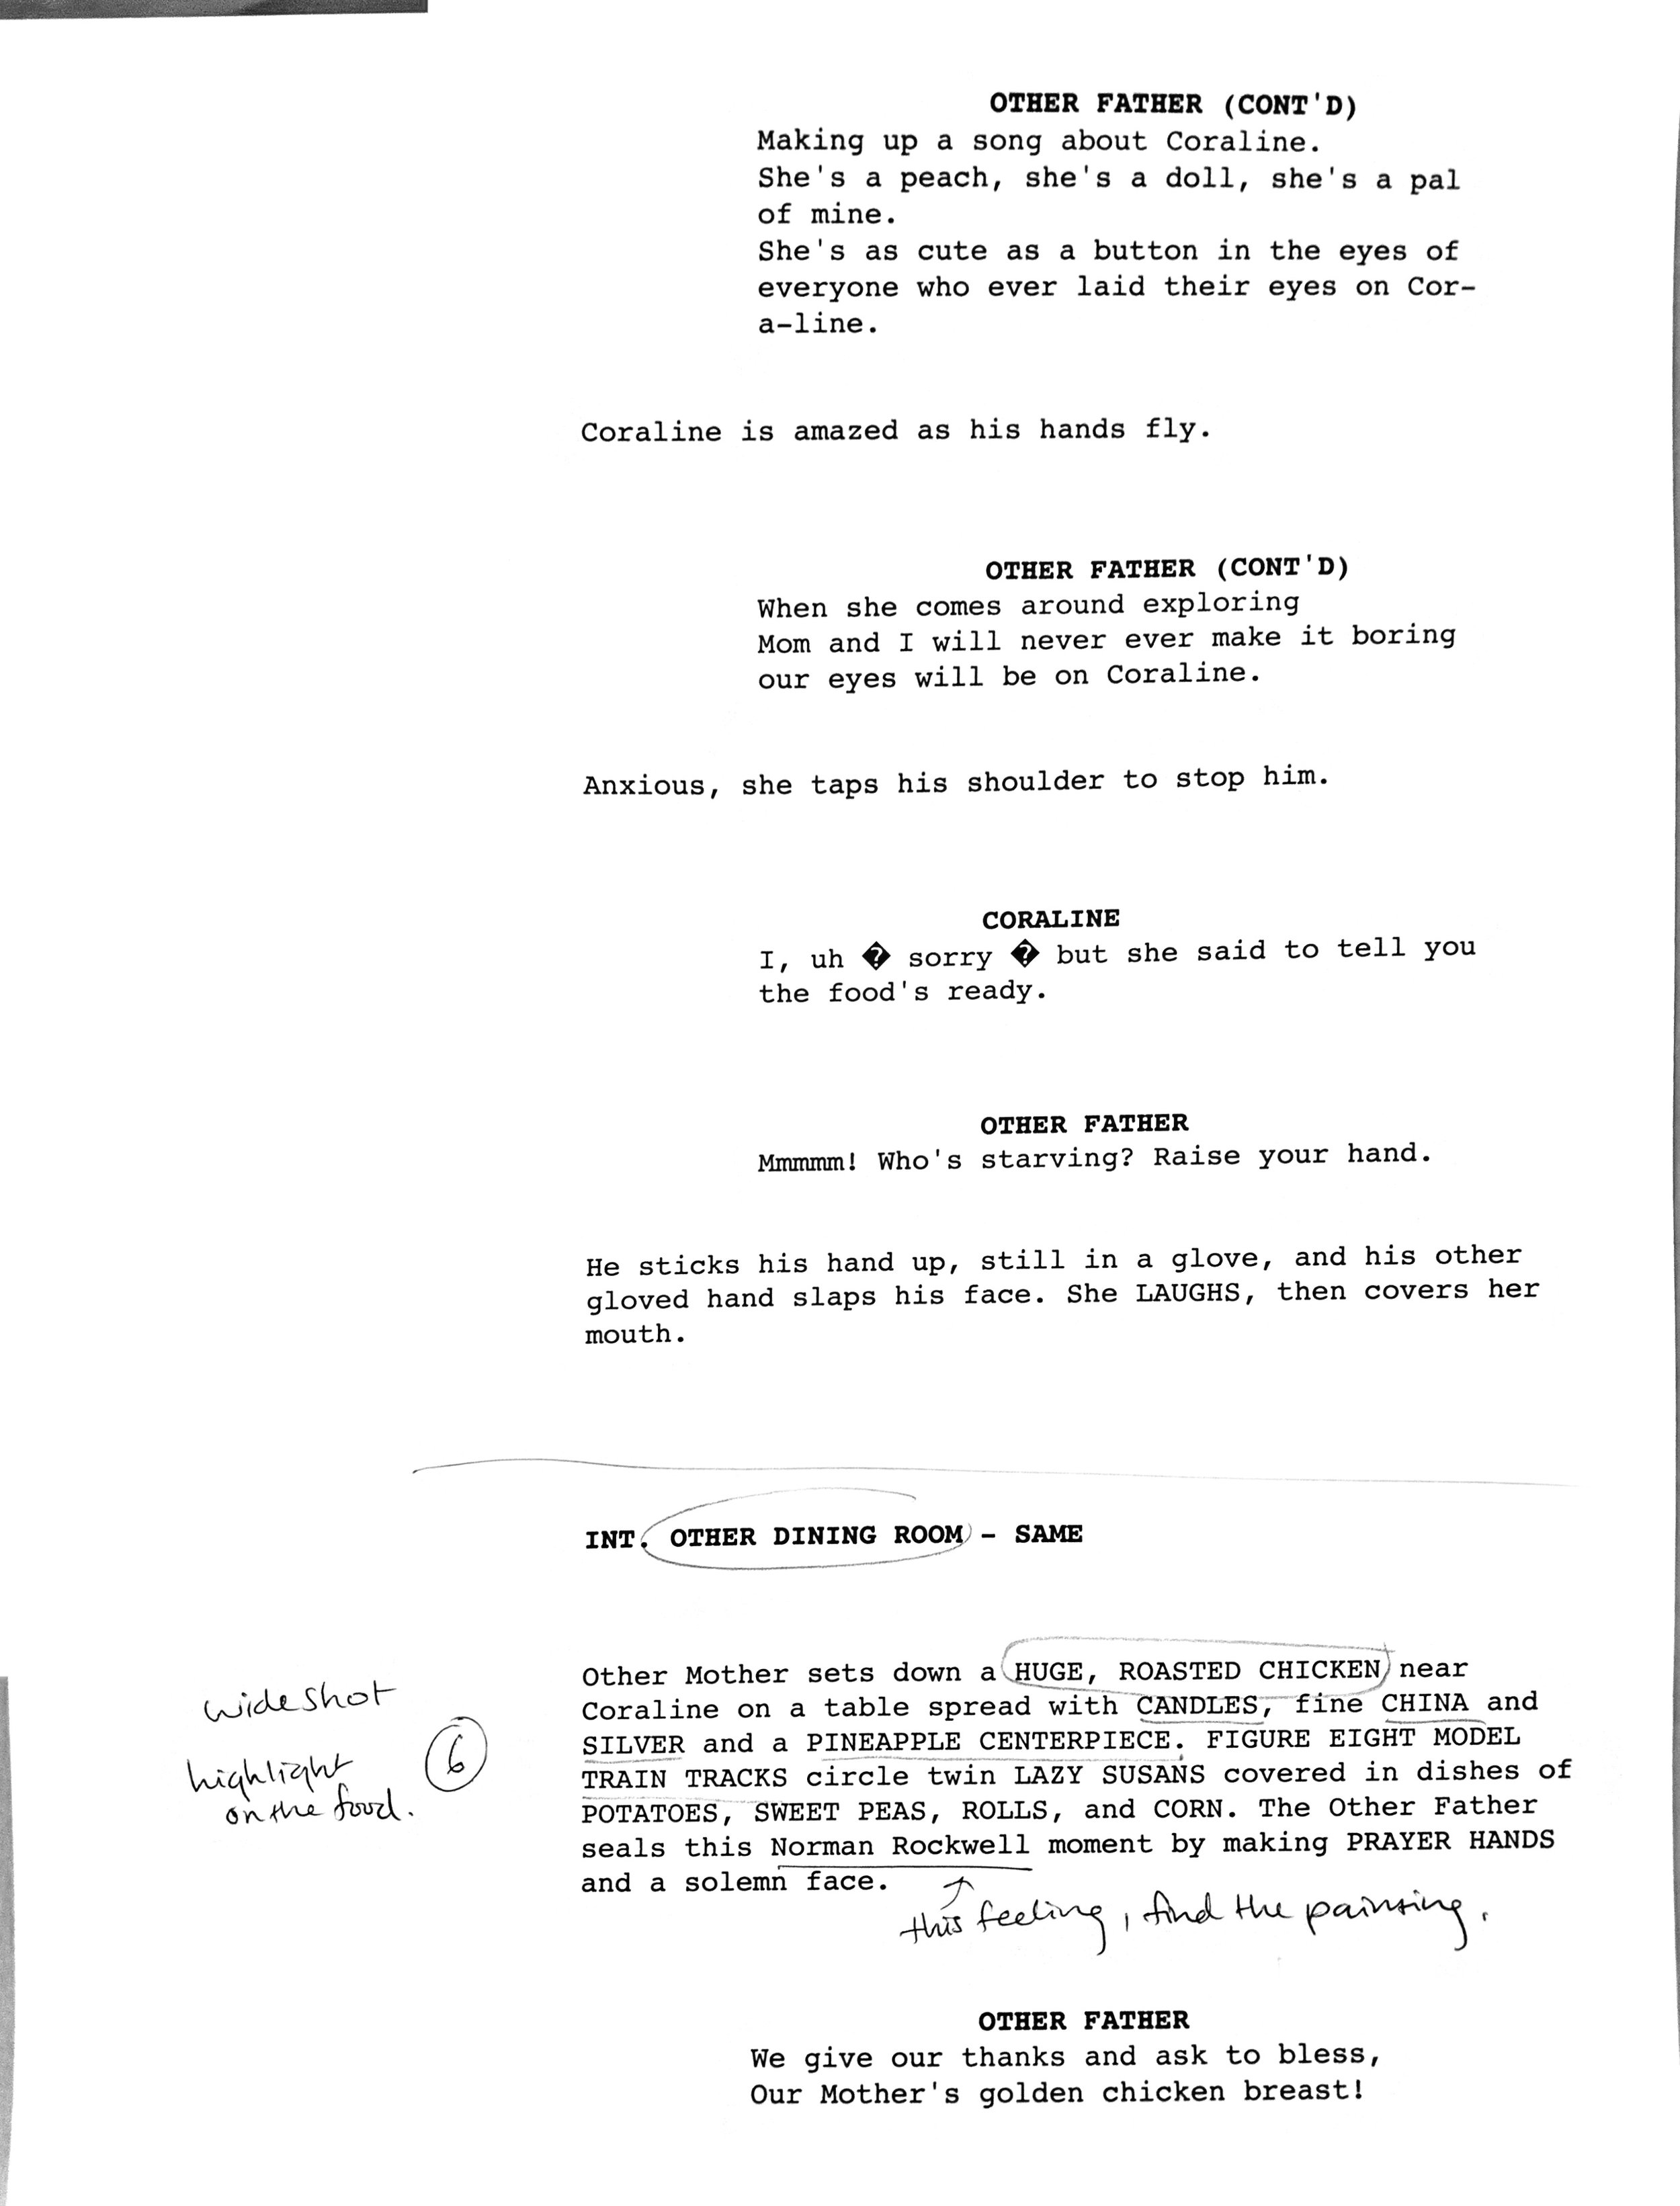
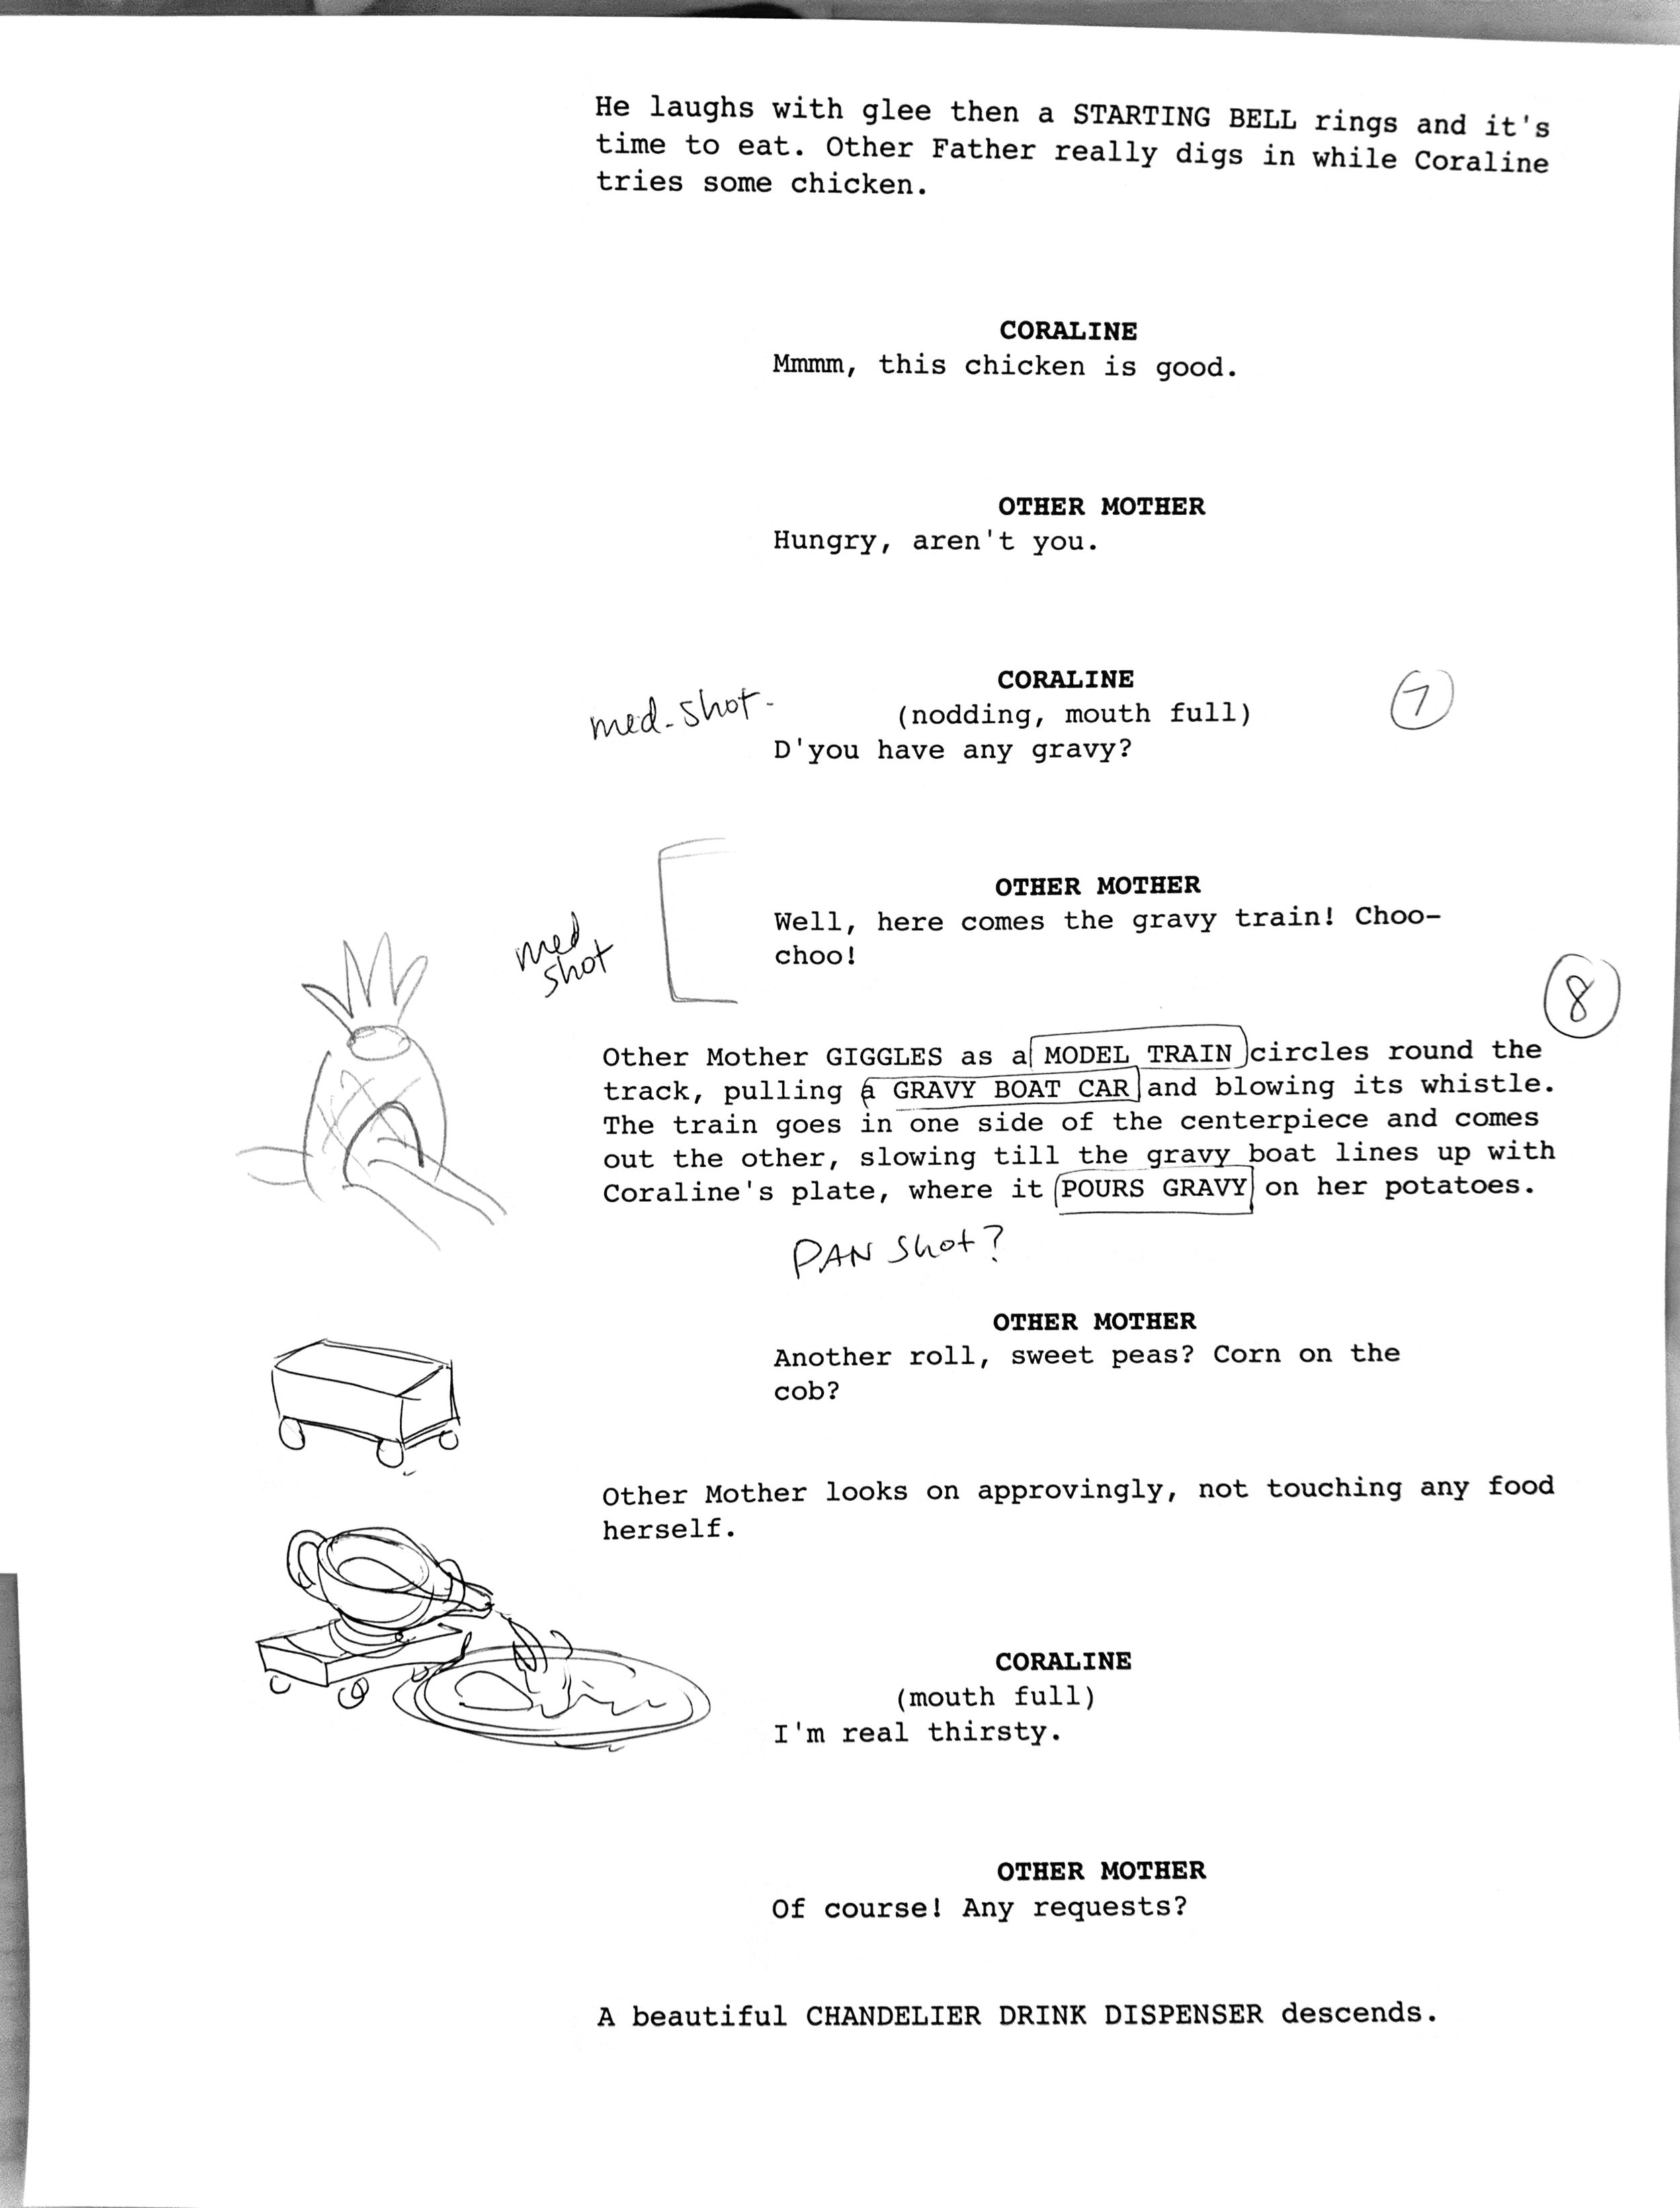
Here is my annotated script from Coraline to give you an idea of what’s expected for homework. Feel free to add thumbnails if it helps!

Script_01.jpg
Script_02.jpg
Script_03.jpg
Script_01.jpg Script_02.jpg Script_03.jpg

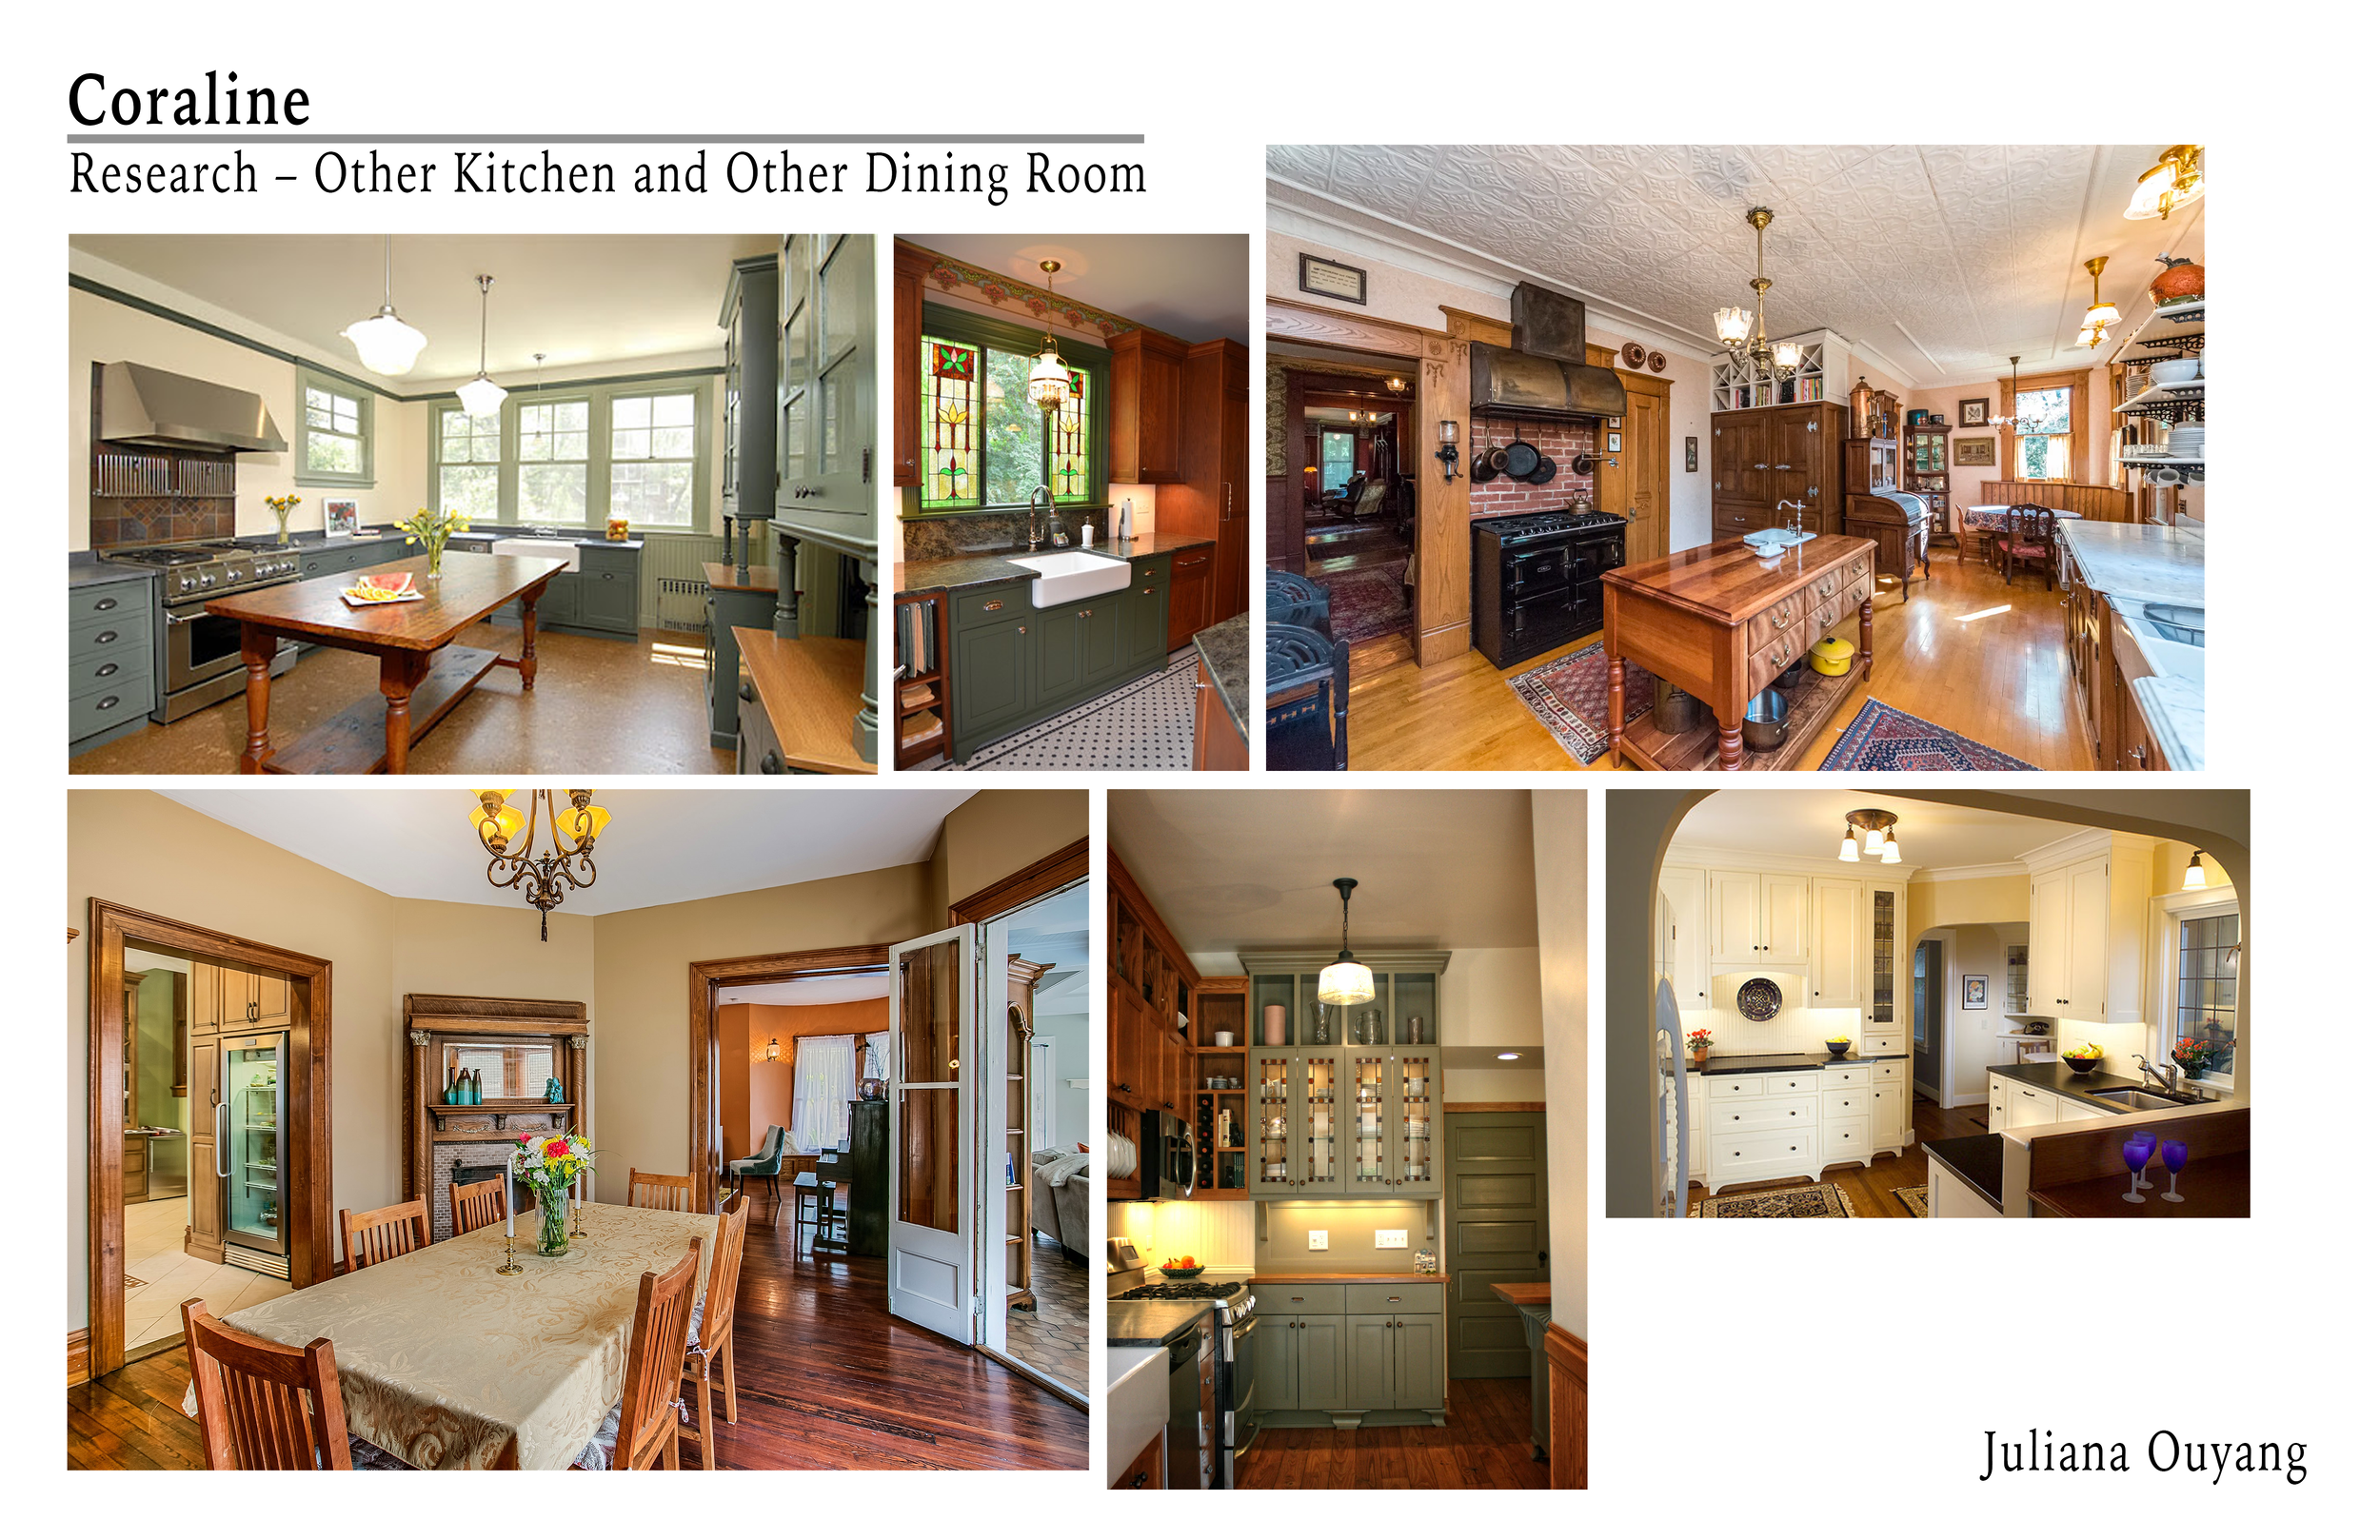
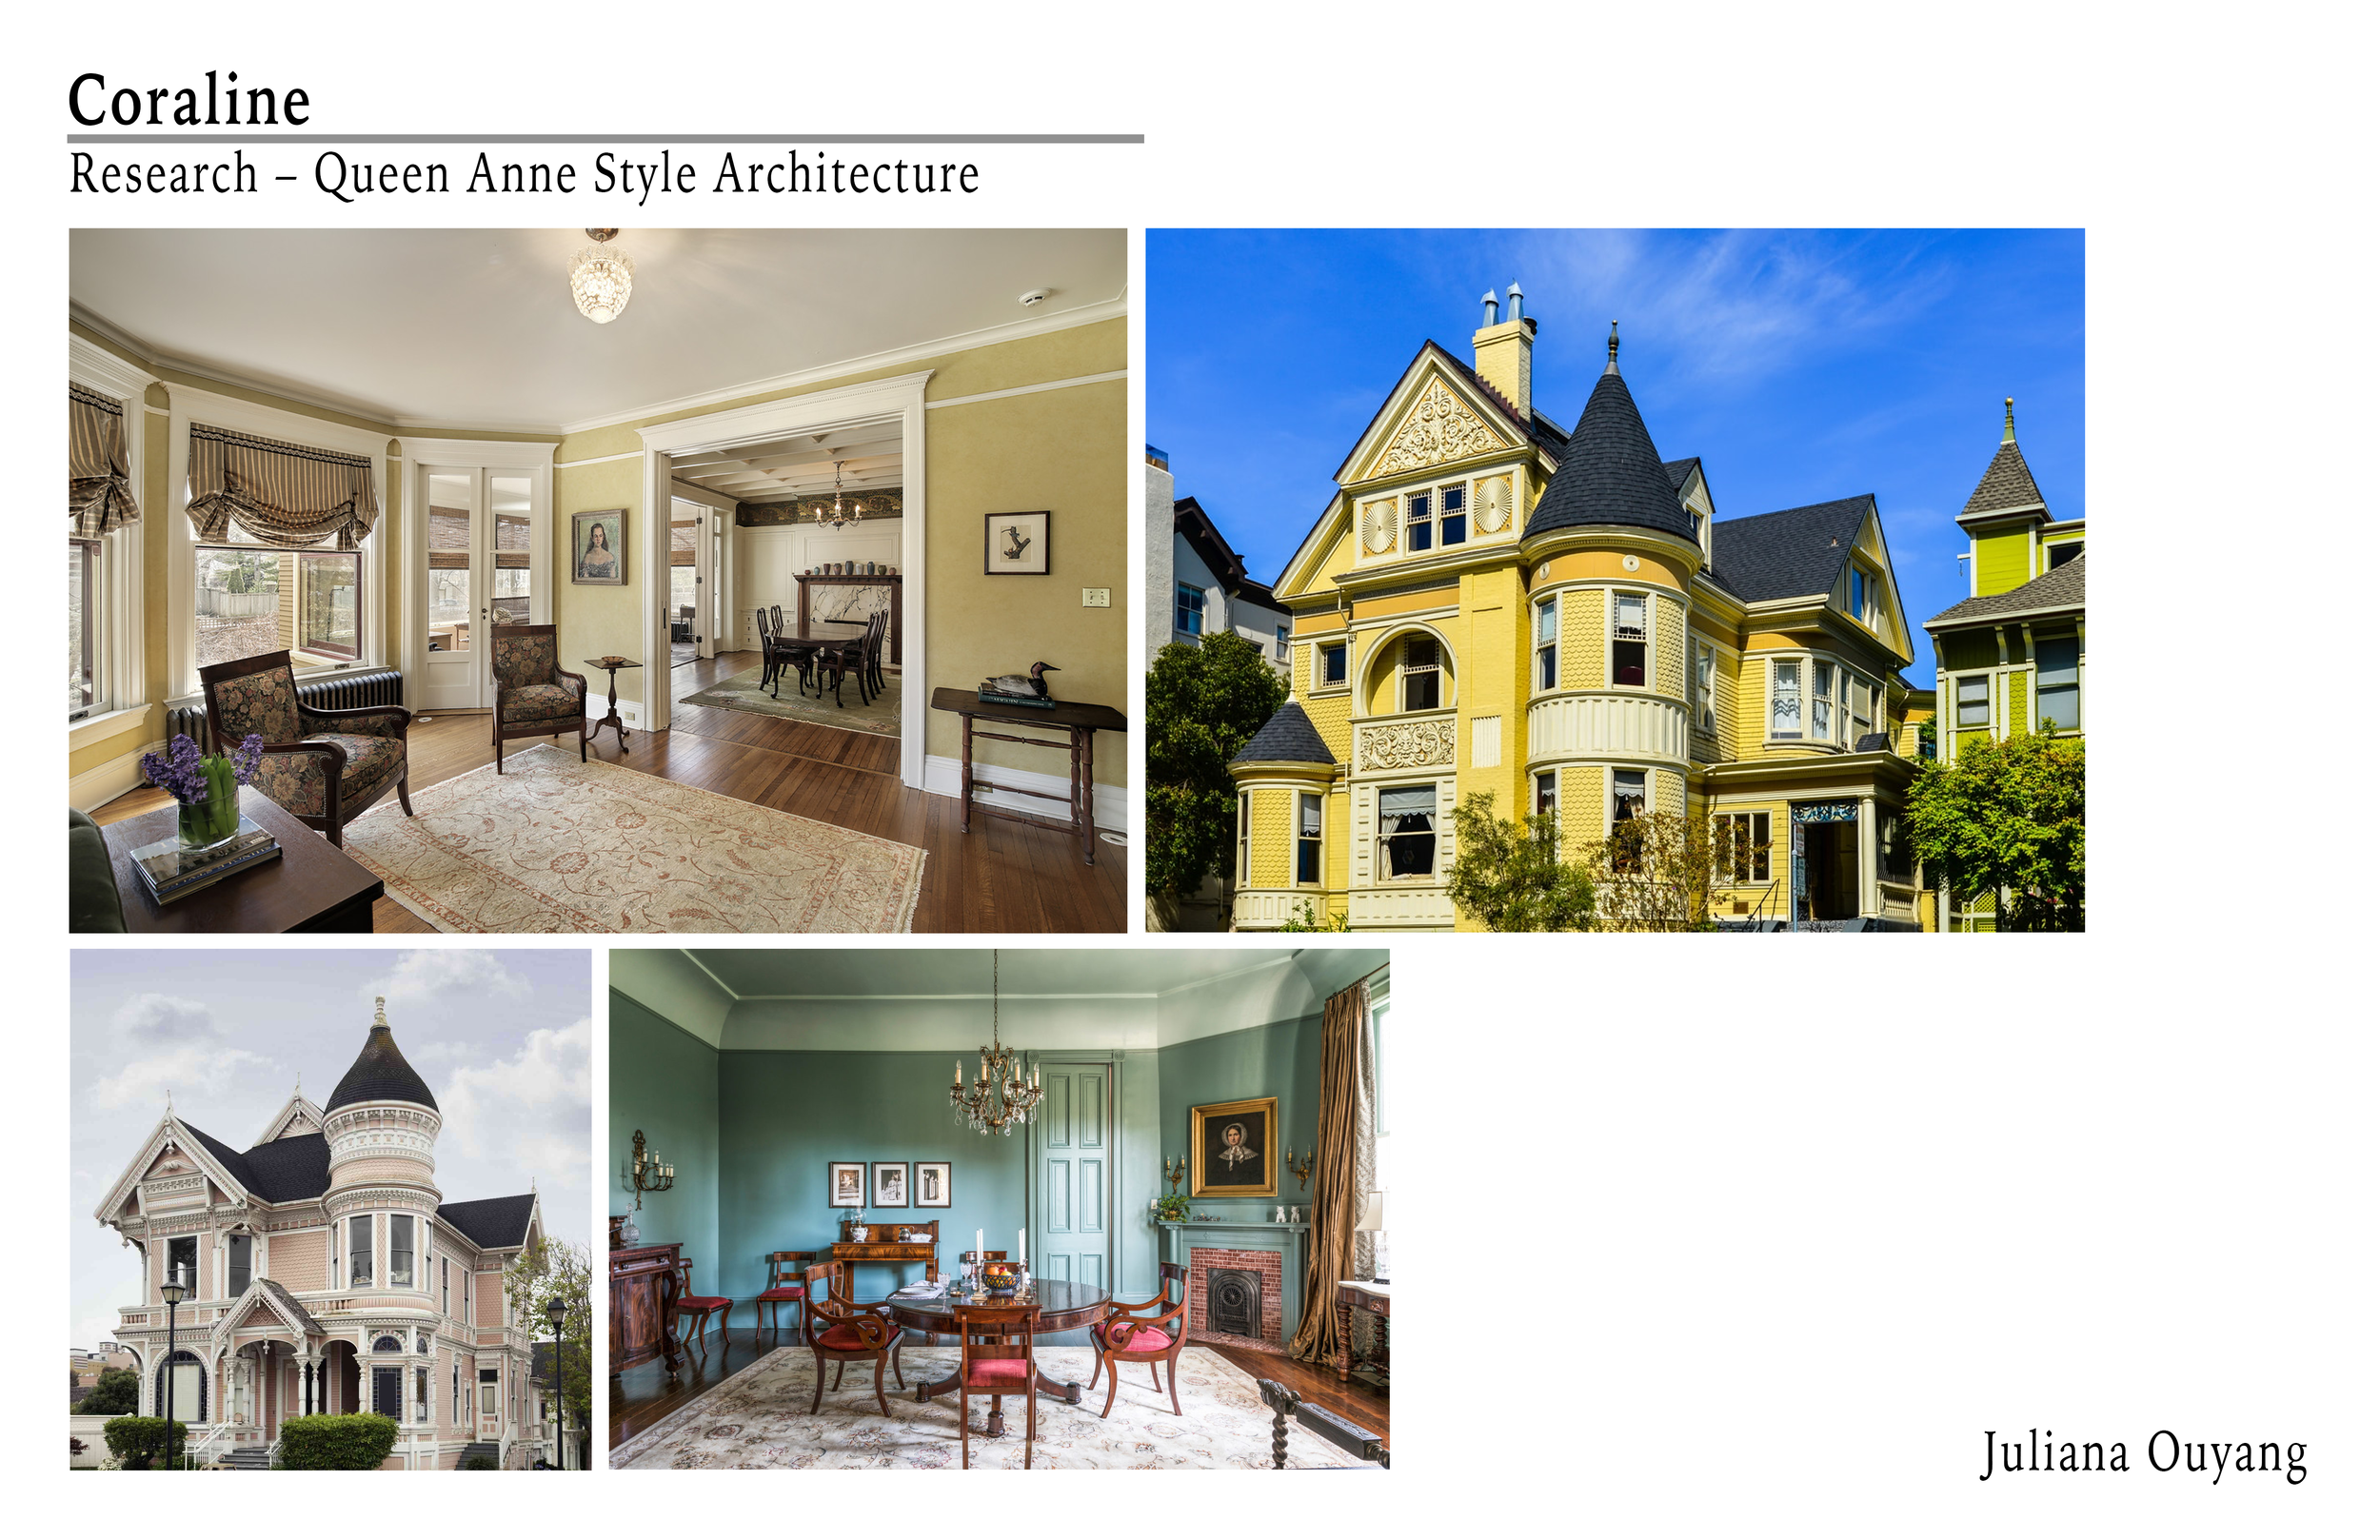
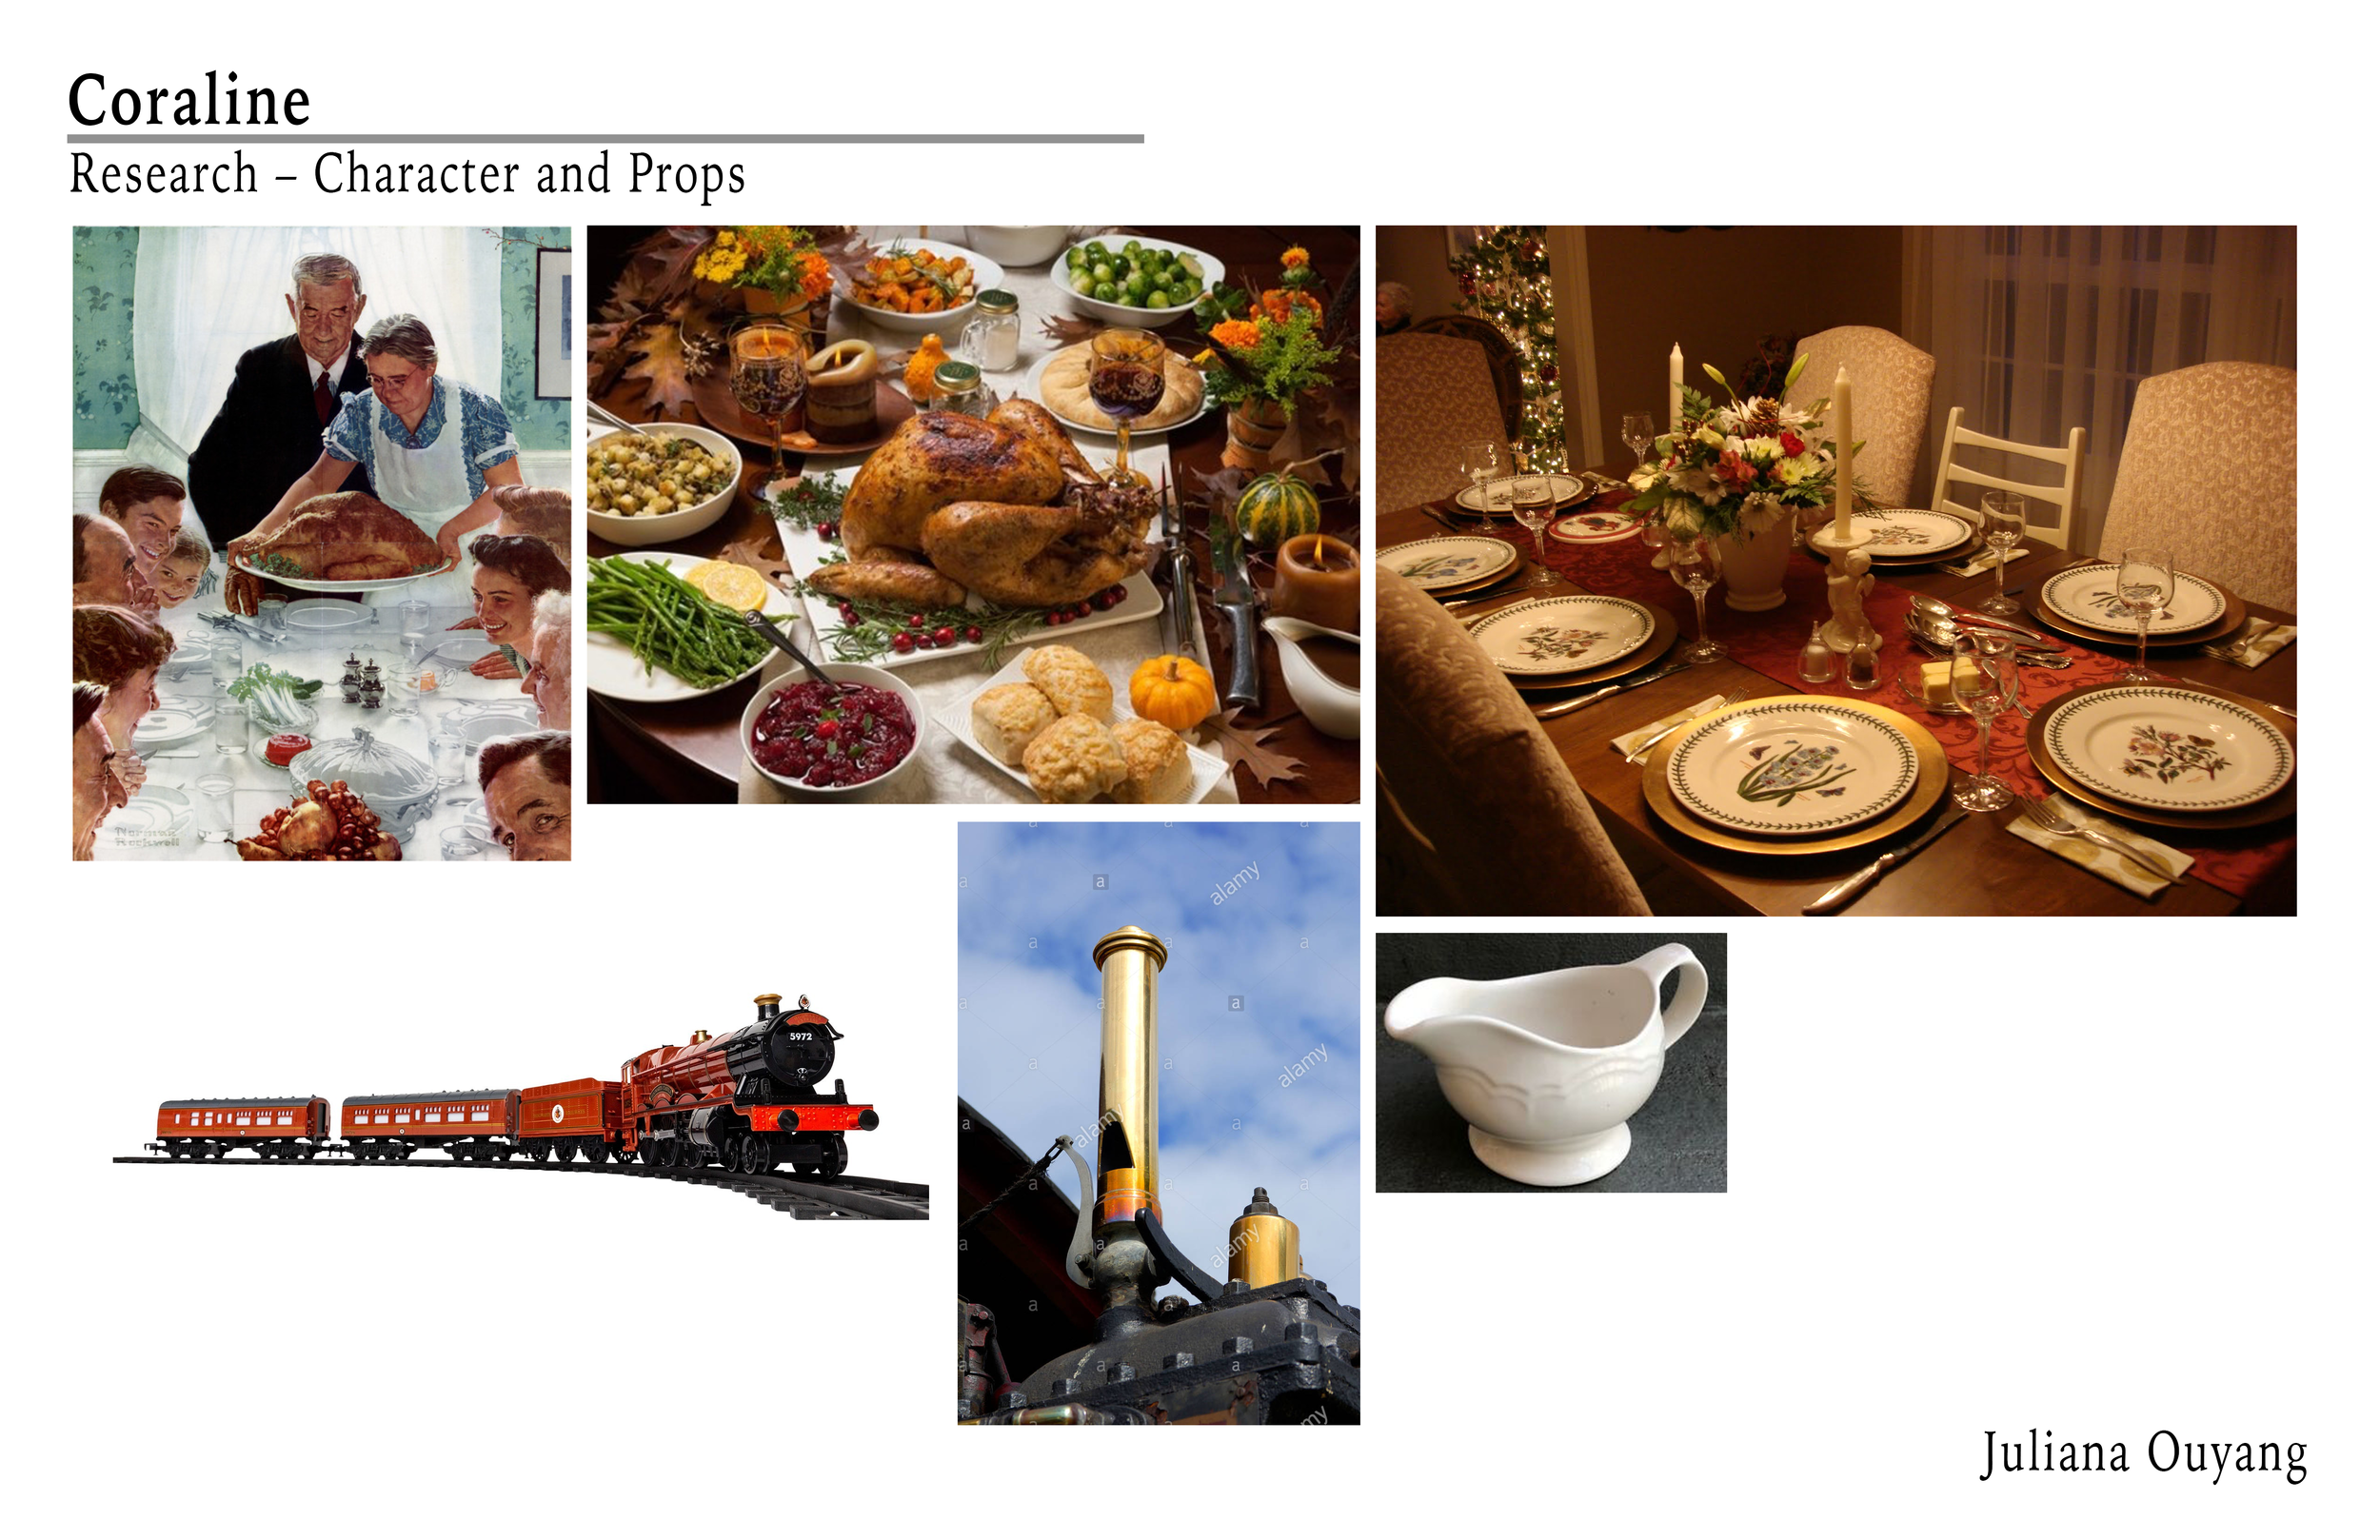
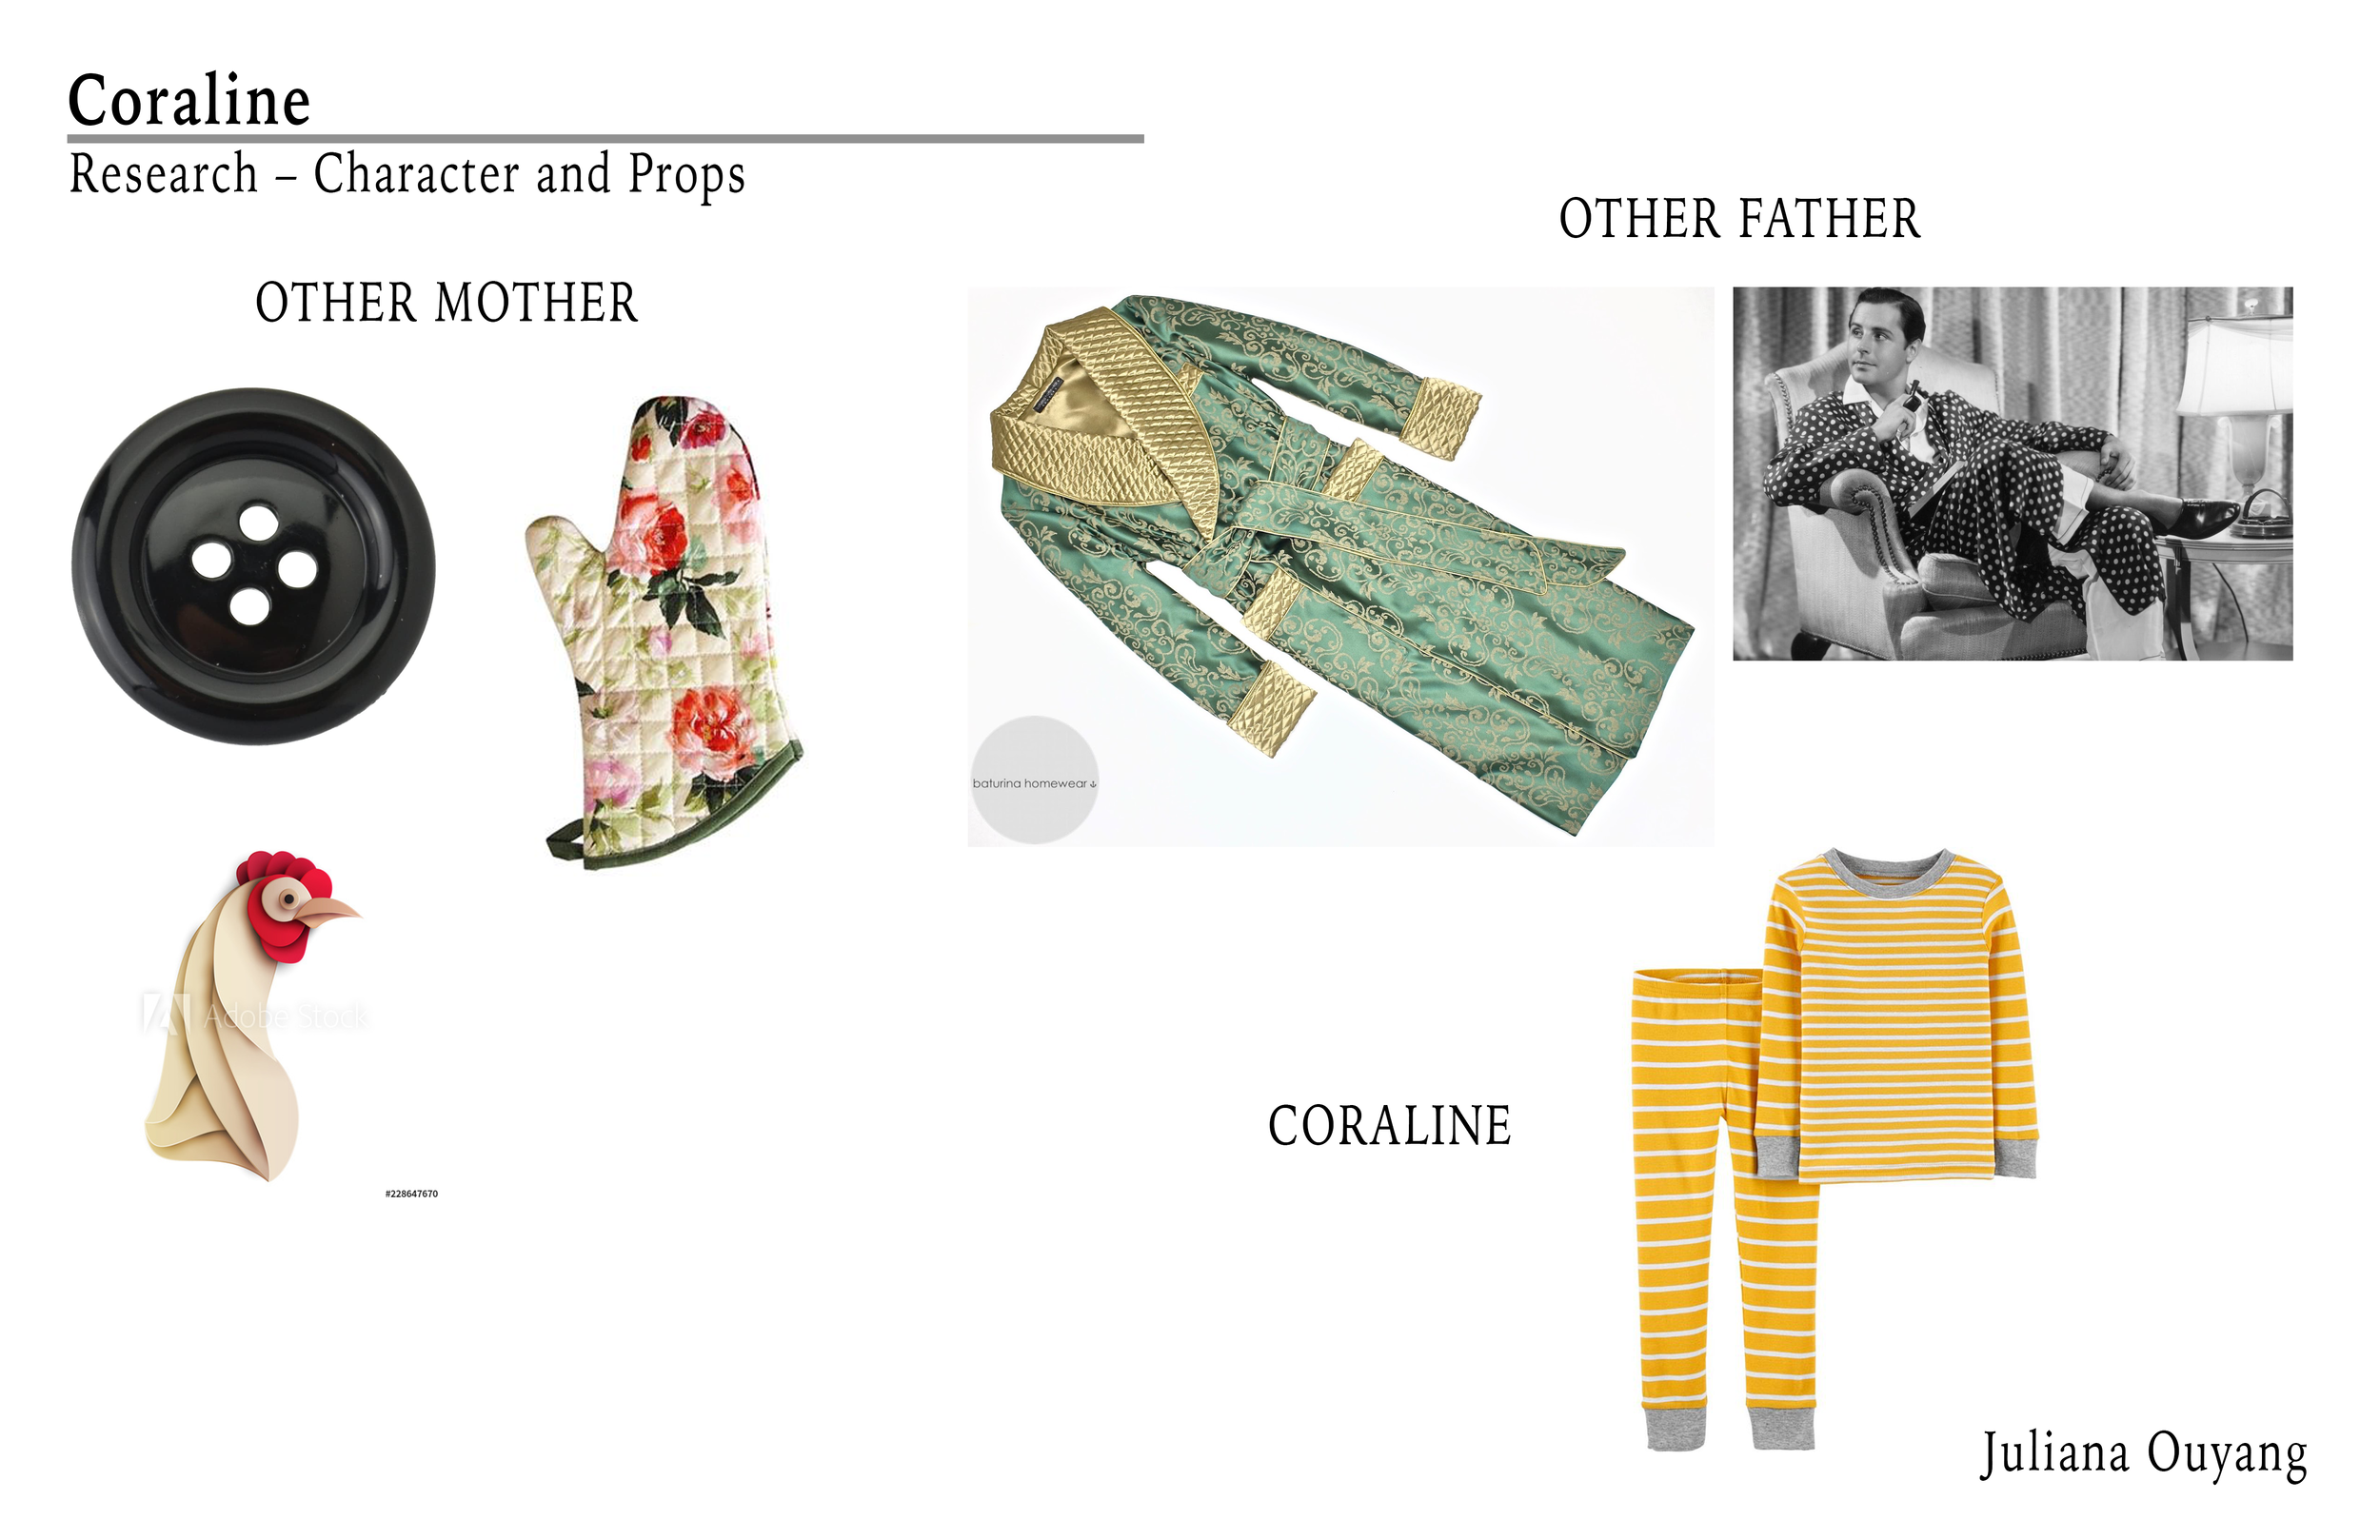
Here are my reference pages for the scene I chose from Coraline. I’m thinking of designing the “gravy train car” that’s on the dinner table.

Coraline_Reference_01.png
Coraline_Reference_02.png
Coraline_Reference_03.png
Coraline_Reference_04.png
Coraline_Reference_01.png Coraline_Reference_02.png Coraline_Reference_03.png Coraline_Reference_04.png Coraline_Reference_04.png
Friday 03.25.22
Posted by Fernando Olmedo
 

Wk 10: Storyboard Studies, Floor Plan

Hello all,

This week we will be continuing our storyboard studies, but more in-depth. Specifically, we will studying one scene from a live action movie and one scene from an animation movie. We will look at how space (interior or exterior), characters, and objects sit in one scene.

For homework:

  • 2 pgs bigger storyboard studies from one scene in a different live action movie (4 on a page)

  • Rough floor plan drawing for scene from live action movie

  • 2 pgs bigger storyboard studies from a different animation movie (4 on a page)

  • Rough floor plan drawing for scene from animation movie

Note: One of the scenes needs to be in an exterior space, and the second scene needs to be in an interior space. Be sure to include the title of the movie/year at the top of your pages and your name on the bottom right.

Here are some samples.

Rough Floor plan from Terminator 2 interior scene.

Sample of live action storyboard studies.

For Reference:

Terminator 2 example: LINK

Madmen Pilot example: LINK

Good luck!

Friday 03.18.22
Posted by Fernando Olmedo
 

Wk 09: Storyboard Studies

Hello all,

This week we are studying from live action and animation films to learn about and expand our visual library of storyboarding.

You can utilize the ArtCenter library for access to films, including their online streaming subscription with Kanopy. Note that if you have access to any LA County library you also have access to Kanopy! Watch the movies and pause for each storyboard you want to study.

In terms of what movies to choose, pick one film that is pre-1990 and the second one can be from any year.

This is what’s for homework:

  • Storyboard studies from live action film

  • storyboard studies from animation film

    Note: 9 studies per page, include movie title on top of page. 5 pages total.

Remember to include all necessary notes for each storyboard study per my example. Good luck and have fun!

This is my live action movie example. Note how I put the “HL”, horizon line, on the storyboard study.

This is my animation film movie example. I have 3 storyboards side by side comparison with the screenshots so you can see how I interpreted them.

For reference if needed:

Watch2Gether: HERE

Screenshots of 101 Dalmatians from class: HERE

101 Dalmatians(1961) movie: HERE

Storyboard Basics Presentation: HERE

Friday 03.11.22
Posted by Fernando Olmedo
 

Wk 08: Final Treasure Chest Setup and Drawing

Hi All,
This week you get to take your final design into perspective. The most important part is to make sure you setup your grid layout properly and show your construction. Here’s all the supporting videos…you might not need to see all of them simply because they’re so specific to Fernando’s drawing. The first one is the most important to set up your grid layout on the grid of your choice.

Homework this week is as follows:

  • Treasure chest orthographic drawing (pen clean version)

  • Treasure chest construction drawings: big shapes, accents and details

  • Treasure chest final drawing

To be included in your presentation, please bring:

  • Grid Set-up Front View

  • Grid Set-up Side View

  • Reference page(s)

You may have more construction drawings than just the “big shapes” and “accents and details” pages but you can leave them at home.

About ruler use, you are allowed to use rulers where there are long lines to help with cleanliness. The ruler is still just a tool, so make sure you are following the grid where needed.

Best of luck! You can do this. :)


Friday 03.04.22
Posted by Fernando Olmedo
 

Wk 07: Orthograph drawings, Grid-Setup

Hello!

We’re going to be taking your design sketches and turning them into 2D orthograph drawings. These drawings will help you plot and construct in perspective, but please note that orthograph drawings do NOT have any perspective to them. They are flat!

Homework this week is as follows:

  • Treasure chest Orthographic drawing (Pencil underlay)

  • Treasure chest Orthographic drawing (Pen clean overlay, can push to Wk 8)

  • Grid Set-up, Sideview Grid Set-up

  • Ellipse homework re-do if needed

You’ll be putting into practice everything you’ve learned since day one, so it’ll take some creative problem solving on your part to complete your ortho drawings specific to your design. Here are the supporting videos:

Friday 02.25.22
Posted by Fernando Olmedo
 

Wk 06: Ellipses and Treasure Chest Ideation

Hi All,
This week we went over what ellipses are and how they work. Additionally, now we’re going to be working on designing an awesome treasure chest inspired by an architectural style. So for homework, I’m going to be looking for the following:

  • 2 pgs - Ellipse Swiss Cheese wall - 10 ellipses displayed on three surfaces as demonstrated in class.

  • 1 pg - 5 Cubes in space with ellipses on all visible surfaces.

  • 1 pg - Architecture Study

  • 1 pg - Treasure Chest Ideation (4 front views with 4 side views)

I’m looking forward to seeing some awesome treasure chests! Make sure they’re cool but not too complicated so you can be successful when we do it in perspective.

I found this great PDF online delving into drawing ellipses including some photography that helped me a lot in understanding: The Bad Ellipse: Circles in Perspective

Here are the supporting videos for ellipses:

Friday 02.18.22
Posted by Fernando Olmedo
 

Wk 05: XYZ shapes (x 6) and Treasure Chest Reference

Hi All,

This week we are doing a total of 6 xyz shapes to get us accustomed to drawing complex 3D objects in space. The homework is as follows:

  1. 1 pg 2-curve combo “basic shape”

  2. 1pg Raised center line

  3. 1 pg Lowered center line

  4. 1 pg Mixed center line

  5. 1 pg Chamferred edges

  6. 1 pg Radius edges

  7. 1-2 pgs Architecture Reference page 11x17

Once you’ve done the 2-curve combo, you can trace that to use as an underlay for the raised, lowered, and mixed centerline exercises. Don’t use rulers!

Here are the accompanying videos which are for reference only (follow what I did in class not what's in the video):

These are my treasure chest reference pages. Note that I have a hierarchy of images which don't overlap each other. The title/name is on the page as well.

Friday 02.11.22
Posted by Fernando Olmedo
 

Wk 04: Mirroring Curves, Extruding, and X,Y,Z, Shapes

This week we learned how to mirror curves in each axis, and are introducing the x,y,z shape. Do your best to get good line quality and accurate construction. Make sure your grids are working properly! The homework is as follows:

  1. 2 pgs of 2D mirrored curves in perspective. (4 shapes per page)

  2. 2 pgs of 3D extruded shapes in perspective. (4 shapes per page)

  3. 2 pgs x,y,z shape combining everything that we’ve learned so far. Keep it simple to make your life easier. Only one xyz shape per page.

  4. 1 Architectural Reference image for your Treasure Chest

For your reference, here are demos on each of the homework sections this week:

Friday 02.04.22
Posted by Fernando Olmedo
 

Wk 03: Grids + Multiply/Divide

Homework due week 3:

  1. (5 pgs) Clean grids using the Brewer grid construction method

  2. (4 pgs) Multiplied/Divided boxes

*Note that any incorrectly constructed grids will have to be redone and checked every week until they are 100% correct.

This week we focused on constructing grids and multiplying/dividing in perspective. The grids are going to be super important and a foundation for a lot of your drawing so take the time to really dial it in. The book “how to draw” which is on reserve at the library, has a step by step on how to construct these grids. Below are videos Fernando recorded to help you with this week’s homework. Let me know if you have any questions by emailing me.

Good luck!

categories: Homework
Friday 01.28.22
Posted by Fernando Olmedo
 

Wk 02: Line exercises + Boxes

Hello!

Here’s what’s for homework:

  1. (your best 2 pgs) Line Exercises - parallel lines, connecting dots, intersecting lines, fanning lines, line weights

  2. (5 pgs) One point perspective boxes - above and below the horizon line

  3. (5 pgs) Two point perspective boxes - above and below the horizon line

Every week I will be updating the blog to help you refer back to what we did in class. This week I want you to get acquainted with the tools and practice the fundamentals.

The videos below were kindly created by Fernando Olmedo when he was co-teaching with me. They’re here as reference only. Here are video links to each section of the homework and how to post to digitize your work for grading (for remote learning):

tags: Wk 2, homework, one point, two point
categories: Homework
Friday 01.21.22
Posted by Fernando Olmedo